How To: Make Wire Bangles with Wraps - Art & Soul Learn To make t


Crafts to Make and Sell - Make Wire Bangles with Wraps - Cool and Cheap Craft Projects and DIY Ideas for Teens and Adults to Make and Sell - Fun, Cool and Creative Ways for Teenagers to Make Money Selling Stuff to Make
Wire Wrapped Jewelry, Wire Jewelry, Jewelry Crafts, Beaded Jewelry, Handmade Jewelry, Diy Schmuck, Schmuck Design, Bling Bling, Jewelry Accessories
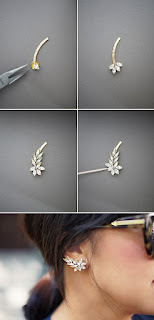
Learn to make these trending bangles with wire wraps around each stone . Introduction Usually, I preferred making these fun bangles without making wraps around each stone. But after experimenting around with different stones I have found that sometimes the larger stones do need a little extra support underneath them. In this post, we are going to revise the original bangle how to and add some stylish and functional supporting wire wraps. You Will Need: 1 Kitchen Glass for Bracelet Mandrel Basic Bangles for size guides 1 pair of snipping tools 1 pair of needle nose pliers 5-6 feet of 20 Gage Artistic Wire (Click Here) 3 Moderately Flat Beads (Click Here) Be sure you check out our ever changing stock of flat beads, crystals, and stones. Check out the inspirational designs towards the end of the blog! Step 1: Wrap the Wires BOX 1: Use the kitchen glass to wrap your wires. Each Bangles should have 4 wraps of wire around it. Place on the glass to tighten each strand of wire to desired siz e. Be sure one wire measures about 8-9 inches and the other end of the wire is much longer. BOX 2: Take the short(er) end of wire and wrap around the base of the bangle until it coils 2-3 times BOX 3: Add stone #1 on the open wire and push it down to the coils, then wrap the wire 2-3 times to secure the stone on to the bangle. BOX 4: Taking the rest of the wire you have in your hand you will start to warp it around the stone. NOTE: Do you need a more detailed instruction on how to add your stone? Check out the original How To Blog (Click Here) Step 2: Add the Stone BOX 1: Continue to wrap your wire until you use it up. If you have enough wire you can wrap the wire around the base of the bangle for a touch of style. BOX 2: When you have reached the end of the wire it will be time to secure the wire on to the bangle. This is simple, Just coin the tail around the bangle until you have 2-3 coils. Snip any access. Box 3: Your first stone looks great and it has some stylish wire wraps und erneath that also act as support for the bangle. Its time to add stone #2. Take the wire that is longer and force it down on the bangle going in the direction of the rest of the wire. I usually visualize where the stone will be placed and then I sharply turn the wire and make 2-3 coils around the base of the bangle. Add your stone, then follow the same instructions as the first stone. REMEMBER* This wire has to add two stones so only go around the stone for about 8 inches of wire. BOX 4: Only One more stone to add! Visualize where the stone should be placed and repeat the steps from the first two stones. Finishing Touches! Snip off access wires then apply pressure around the coils to secure! Step 3: Make a BUNCH! We are always looking to find new stones to supply your bangle needs. Check often for stock changes weekly. Be sure you check out the original blog for a few more details with turning wire and adding stones! How To: Make Wire Bangles (Click Here) I hope you enjoy this post and are feeling inspired to make some bangles in this fresh new way! Follow along as I make this bangle on youtube! Leave a comment if you have any questions. Happy Beading

Comments
Post a Comment